If you’re planning to get a new roof, it’s important to make accurate measurements. This is especially true if you want to get the best roofing materials for your home.
You’ll need a tape measure, ladder, pen or pencil and notepad to record your measurements. Also, a calculator is useful for performing calculations and conversions.
Roofing installation is hard work and requires a high level of physical fitness. It’s important to hire skilled and dedicated workers who are not afraid of heights and who enjoy working with their hands. The right crew can help you to complete projects quickly and efficiently without compromising quality.
When it comes to deciding what type of roofing materials to use, your roofing team can walk you through the options that make sense for your goals, architecture and budget. They will also order the roof materials you select and arrange to have them delivered safely to your job site.
Before starting any actual roofing work, it is important to set your budget for the entire project. There are a number of things that need to be factored into this calculation, including material costs, labor costs and other overhead expenses. A qualified accountant can help you to determine an accurate budget before laying the first shingle.
The tear off process can be very messy, so your contractor should take several precautions to protect your property. They should cover sensitive areas of your home and yard with tarps, have a dumpster delivered to store all of the old roofing materials and use wooden boards to protect air conditioning units and other features on the side of your house. They should also have the necessary equipment to safely carry the tear off materials from the roof to a waiting truck.
Preparing Your Home
The first thing that needs to happen when you prepare for a new roof is clearing the work zone. This means removing cars from the driveway and placing them in the garage or on the street, for example. This gives the crew easier access to your home and reduces the risk of their belongings getting hit by flying debris as they work.
You should also take the time to clear away any decorations or furniture that might get damaged by vibrations during a re-roofing project. This is especially important if you have small children or pets in the house. They may be unnerved by the constant hammering and noise, or they might be accidentally hit by falling debris. Leaving them with friends or family members for the duration of the roofing process is probably best.
Finally, it’s a good idea to cover any indoor furnishings with sheets or plastic tarps. This will protect your belongings from dust, dirt, and stains. The same goes for outdoor possessions like lawn furniture, grills, and decorative items. It’s also a good idea to place tarps over any flower beds or other landscaping that could be harmed by dropping debris. Inform the roofers about any particularly delicate plants so that they can give them a wide berth. You should also mark any ponds or other water features so that roofers know to steer clear of them.
Installing the Underlayment
The underlayment acts as an extra layer of protection on your roof deck, protecting the underlying shingles and other roofing materials from moisture. It also serves as a barrier to the sun’s rays and helps block rain. There are several different types of underlayment, each with its own benefits and drawbacks.
Generally, soft underlayment is used with shingle applications, while hard underlayment is used with metal roofing and cement board. The type of underlayment you choose will depend on the type of roof covering you are installing and the climate in your area.
Asphalt-saturated felt is the most common underlayment. It comes in 15- and 30-pound thicknesses, with the 30-pound option offering more water resistance. This material does not offer full waterproofing, but it can withstand heavy rain. It is also less expensive than rubberized asphalt underlayment and can be left uncovered for 90 to 180 days.
Synthetic underlayment is a great alternative to asphalt felt, offering greater resilience and better wind resistance. It is typically made of polypropylene or polyethylene, and it can withstand UV rays and high temperatures.
Once you have selected a synthetic underlayment, it is important to install it correctly. Ensure that it is rolled out evenly, with the printed anti-slip surface facing up. It is important to follow the manufacturer’s recommendations and local building codes when installing underlayment. It is also important to inspect your underlayment regularly for signs of deterioration.
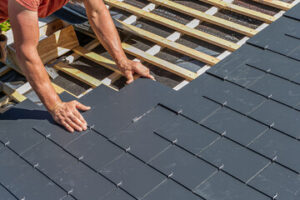
Installing the Shingles
Once the underlayment is in place, roofers start laying the shingles. They begin at the bottom and work their way to the ridge. During this step, they carefully overlap each shingle and nail it in the proper place. It’s important to nail in the right spot to prevent water penetration and wind damage to your shingles. To help with this, they use a chalk line to mark where the nail zone is for each row of shingles and follow it throughout the entire roof.
If your home has valleys, the roofers will take this time to install a special kind of flashing to keep these areas leakproof. They’ll also seal any spots where your roof meets a wall with step flashing. In addition, they’ll cap the ridge using specialty shingles.
At this point, the roof is almost completely covered with shingles. However, the roofing contractor may have to add some extra elements to complete the job. For example, if the roof has any vent pipes or other protrusions, the roofers will need to install additional flashing and maybe even an ice and water shield to protect these areas from leaks. They’ll also want to install a drip edge along the edges of the roof to keep water away from the underlayment and shingles. Finally, they’ll do a final check to ensure there are no crooked or missing shingles and that the ridge cap looks seamless.
Installing the Flashing
Flashing, made of aluminum or galvanized steel, protects roof points vulnerable to leaks. These include dormer features, vents, chimneys, skylights, and roof valleys. Without it, water would run off shingles into the seams and spaces around these features and cause them to rot, as well as damage the interior of your home. Flashing keeps this from happening by directing water back onto the shingles, where it belongs.
To install flashing, a roofer will remove the existing shingles to the underlying underlayment layer and then apply a waterproof sealant to the area. The roofing contractor will then install a base piece of flashing at the point where the roof plane meets a vertical protrusion, such as a chimney or plumbing boot. Additional flashing is then installed over the base flashing, called counter-flashing. The two pieces do not need to be fixed to each other, which allows them to flex when the roof and walls expand and contract in different weather conditions.
Then, a row of shingles is laid over the flashing, with each new course overlapping the previous one by at least 3 inches. If your roof has an inside or outside corner along the sidewall, you will need to install corner flashing as well. This is formed by cutting down from a corner of the step flashing at a 45-degree angle and then removing the center bend from this first cut, leaving a triangle. Then, the flashing is bent and nailed in place.
Installing the Ridge Cap
One of the final steps in a roofing project is installing the ridge cap. This is an important piece of the roof that helps keep moisture out and prevents bugs and debris from getting into your home.
Without the protection of a roof ridge cap, moisture would sneak into your home through the seam at the peak of your roof. Over time, this moisture can cause costly damage to your roof system. This can include the formation of mold, mildew, and rot in your roof, as well as leaks into your attic space.
If you notice cracks or deterioration of your ridge cap, it’s vital to have it repaired as soon as possible. Untreated ridge caps can easily be damaged by high winds, which may pry off shingles along the ridge line or pierce the capping material. Water penetration can also occur through the gap caused by a compromised ridge cap, leading to shingle and roof structure damage.
You can choose between a vented or solid closure for your ridge cap. Ventilated ridge caps help reduce energy costs by reflecting sunlight and reducing the amount of heat that is absorbed in your roof. Solid ridge caps are made from durable, weather-resistant materials and provide a more traditional look that complements most roof designs. Start by determining your ridge lines. If you’re using a metal ridge cap, use a chalk line to mark the ridge peak, then center one of the pieces of ridge cap on that point and make a mark at its lower edges on both sides. Repeat this process every 15’-20’ along the ridge line.